
Palo Alto User-ID for Practical Segmentation
This guide explains the architecture and walks through a small pilot: one employee group, one reporting application, and a firewall that identifies the connection. You will connect the directory, enable identity on the user zone, create a scoped rule, and test both permitted and denied access.
As example I am going to base this on Alex, he cannot open a reporting application. The firewall shows a blocked connection, an IP address, and a rule name, but before IT can explain the problem, someone has to work out which account was behind that address.
Meanwhile, Alex is waiting. Someone asks whether allowing the whole office network would get things moving. That might remove the immediate obstacle, but it can also leave more people with access than the application needs.
User-ID helps put the account into that decision. Combined with accurate directory groups, it lets a Palo Alto Networks firewall evaluate access using who is connecting, alongside the destination, application, and other rule conditions, so lets deep dive now!

The error that makes access harder to manage
The mistake is treating a network location as sufficient evidence of a person's access needs. A subnet can contain employees with different responsibilities, and their addresses can change when they reconnect.
When exceptions accumulate, each new ticket can become another investigation into addresses, old rules, and undocumented intent. User-ID gives the team a way to express approved group access. The benefit depends on identity being correct at the firewall making the decision.
Why the firewall needs two answers
Think of an office seating chart and an employee directory. The seating chart tells you who is at a desk now. The directory tells you which team they belong to. The firewall needs the equivalent of both.
User mapping links the current IP address to an account. In this pilot, an existing GlobalProtect gateway provides that mapping when the employee connects. Group mapping links the account to an approved access group. Cloud Identity Engine, or CIE, supplies directory information through Directory Sync.
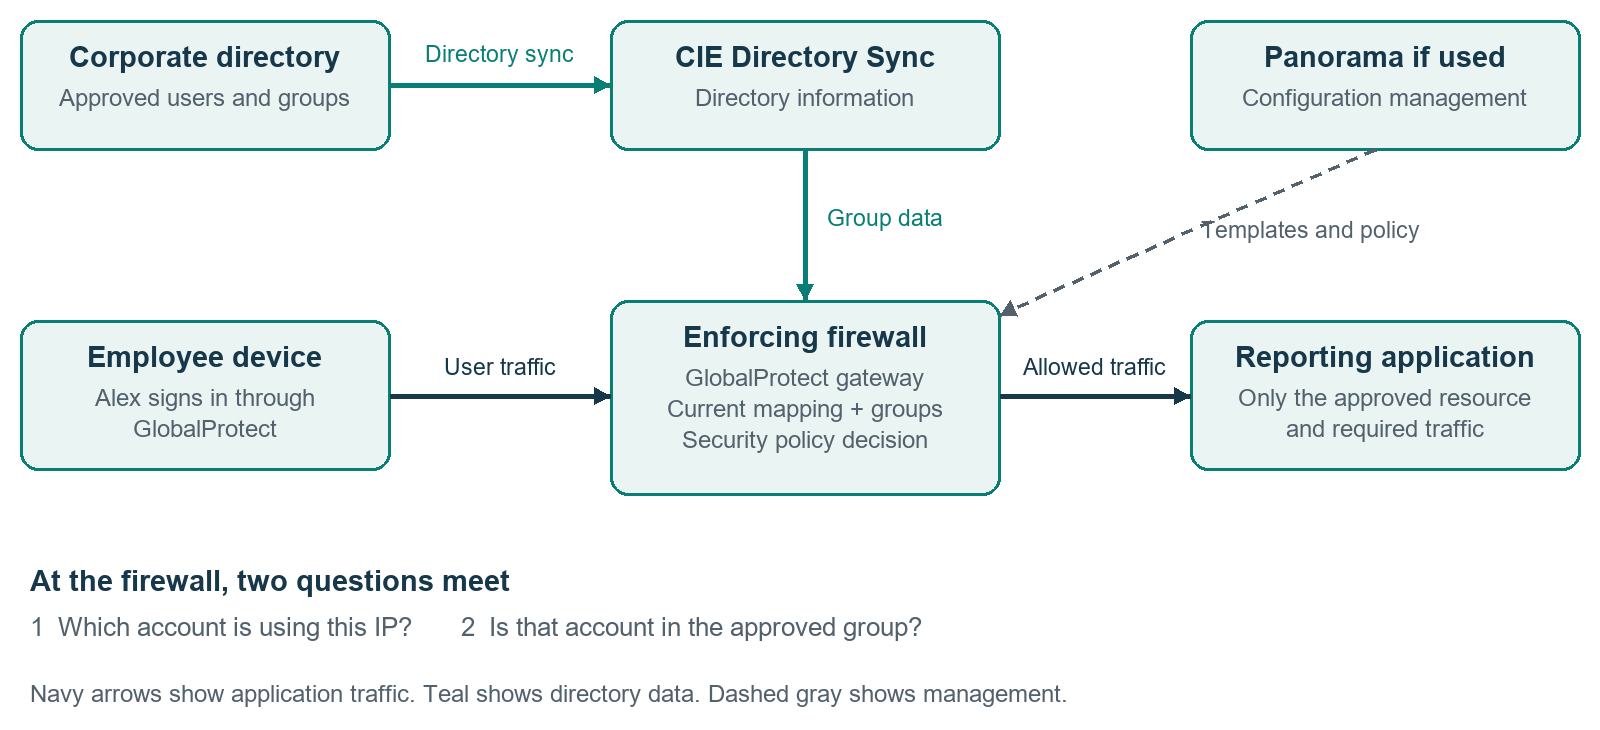
A synchronized directory alone does not tell this design who is using an IP address right now. CIE has other capabilities, including User Context; this example uses its directory function and GlobalProtect for the active mapping.
Panorama manages configuration. Templates carry device and network settings; device groups organize security policies. A successful push does not prove that identity reached the enforcing firewall. Check that firewall directly.
The starting point for this walkthrough
Use a PAN-OS 12.1 firewall with one virtual system, an existing working GlobalProtect user connection, and a reachable test application. A virtual system is a separate firewall context on the same device. The instructions add User-ID to that foundation; they do not build a VPN, directory, or reporting application from scratch.
Choose Step 1A for Microsoft Entra ID or Step 1B for on-premises Active Directory. Complete one directory path, then continue with Step 2. Readers using an existing, healthy CIE directory can start at the directory check at the end of their chosen path.
Prepare a small pilot you can explain
Use an isolated lab or an approved change window. Ask the application owner to identify one application and two test accounts: Alex should have access; Morgan should not. Both accounts must already be able to sign in through GlobalProtect.
Record these values before editing. The example addresses and names are fictional. Replace them with your own values wherever they appear later.
| Item | Example | Where to obtain your value |
|---|---|---|
| Access group | Finance-Reporting-Pilot | Create it in Step 1A or 1B |
| User accounts | alex@example.com and morgan@example.com | Your directory administrator |
| Tunnel source zone | GP-USERS | Network > GlobalProtect > Gateways > your gateway > Agent > Tunnel Settings; then find that tunnel under Network > Interfaces > Tunnel |
| Pilot source addresses | 192.0.2.25/32 and 192.0.2.26/32 | The two connected GlobalProtect test sessions |
| Application server | 198.51.100.20/32 | Application owner and existing traffic logs |
| Destination zone | REPORTING | The existing traffic log for the application connection |
| Application traffic | ssl over TCP 443 | This example assumes a dedicated HTTPS server whose traffic is identified as ssl |
Keep the two test sessions connected while applying the first rules. If a tunnel address changes, update its pilot address object before retesting. Do not substitute the whole employee pool for these two addresses during the initial experiment.
Save the current configuration
On a standalone firewall, open Device > Setup > Operations > Export named configuration snapshot, select running-config.xml, and save the export as before-user-id-pilot.xml. This preserves the committed configuration. On Panorama, use Panorama > Setup > Operations > Export named Panorama configuration snapshot and export its running configuration. Record the target firewall, template stack, device group, and rules currently matching both test users. Keep any unrelated pending edits separate from the pilot.
Activate CIE if it is not already available
Sign in to the Palo Alto Networks hub with the Customer Support Portal account associated with the firewall. Open the CIE activation workflow. In the Activation Console, choose Activate, select the correct support account and recipient tenant, choose your approved region, accept the terms, and activate. Open CIE for that tenant. Record its region and instance name; the firewall profile must use the same ones.
For an existing CIE instance, open it and confirm that you are in the intended tenant. Do not create a second directory connection simply to repeat this example.
Step 1A Connect Microsoft Entra ID
Create the access group
- Sign in to the Microsoft Entra admin center with permission to manage groups. Open Entra ID > Groups > All groups > New group.
- Set the type to Security, name it
Finance-Reporting-Pilot, and use Assigned membership. This lets you choose the members directly. - Add Alex as a member and assign the appropriate group owner. Leave Morgan outside the group. Do not enable Microsoft Entra role assignment for this application-access group.
- Select Create, reopen the group, and check its member list. Record Alex's actual user principal name, or UPN: the sign-in name that usually looks like an email address.
Authorize the directory connection
- In Entra ID Overview, copy the Directory tenant ID. Have an authorized Global Administrator available for the consent step.
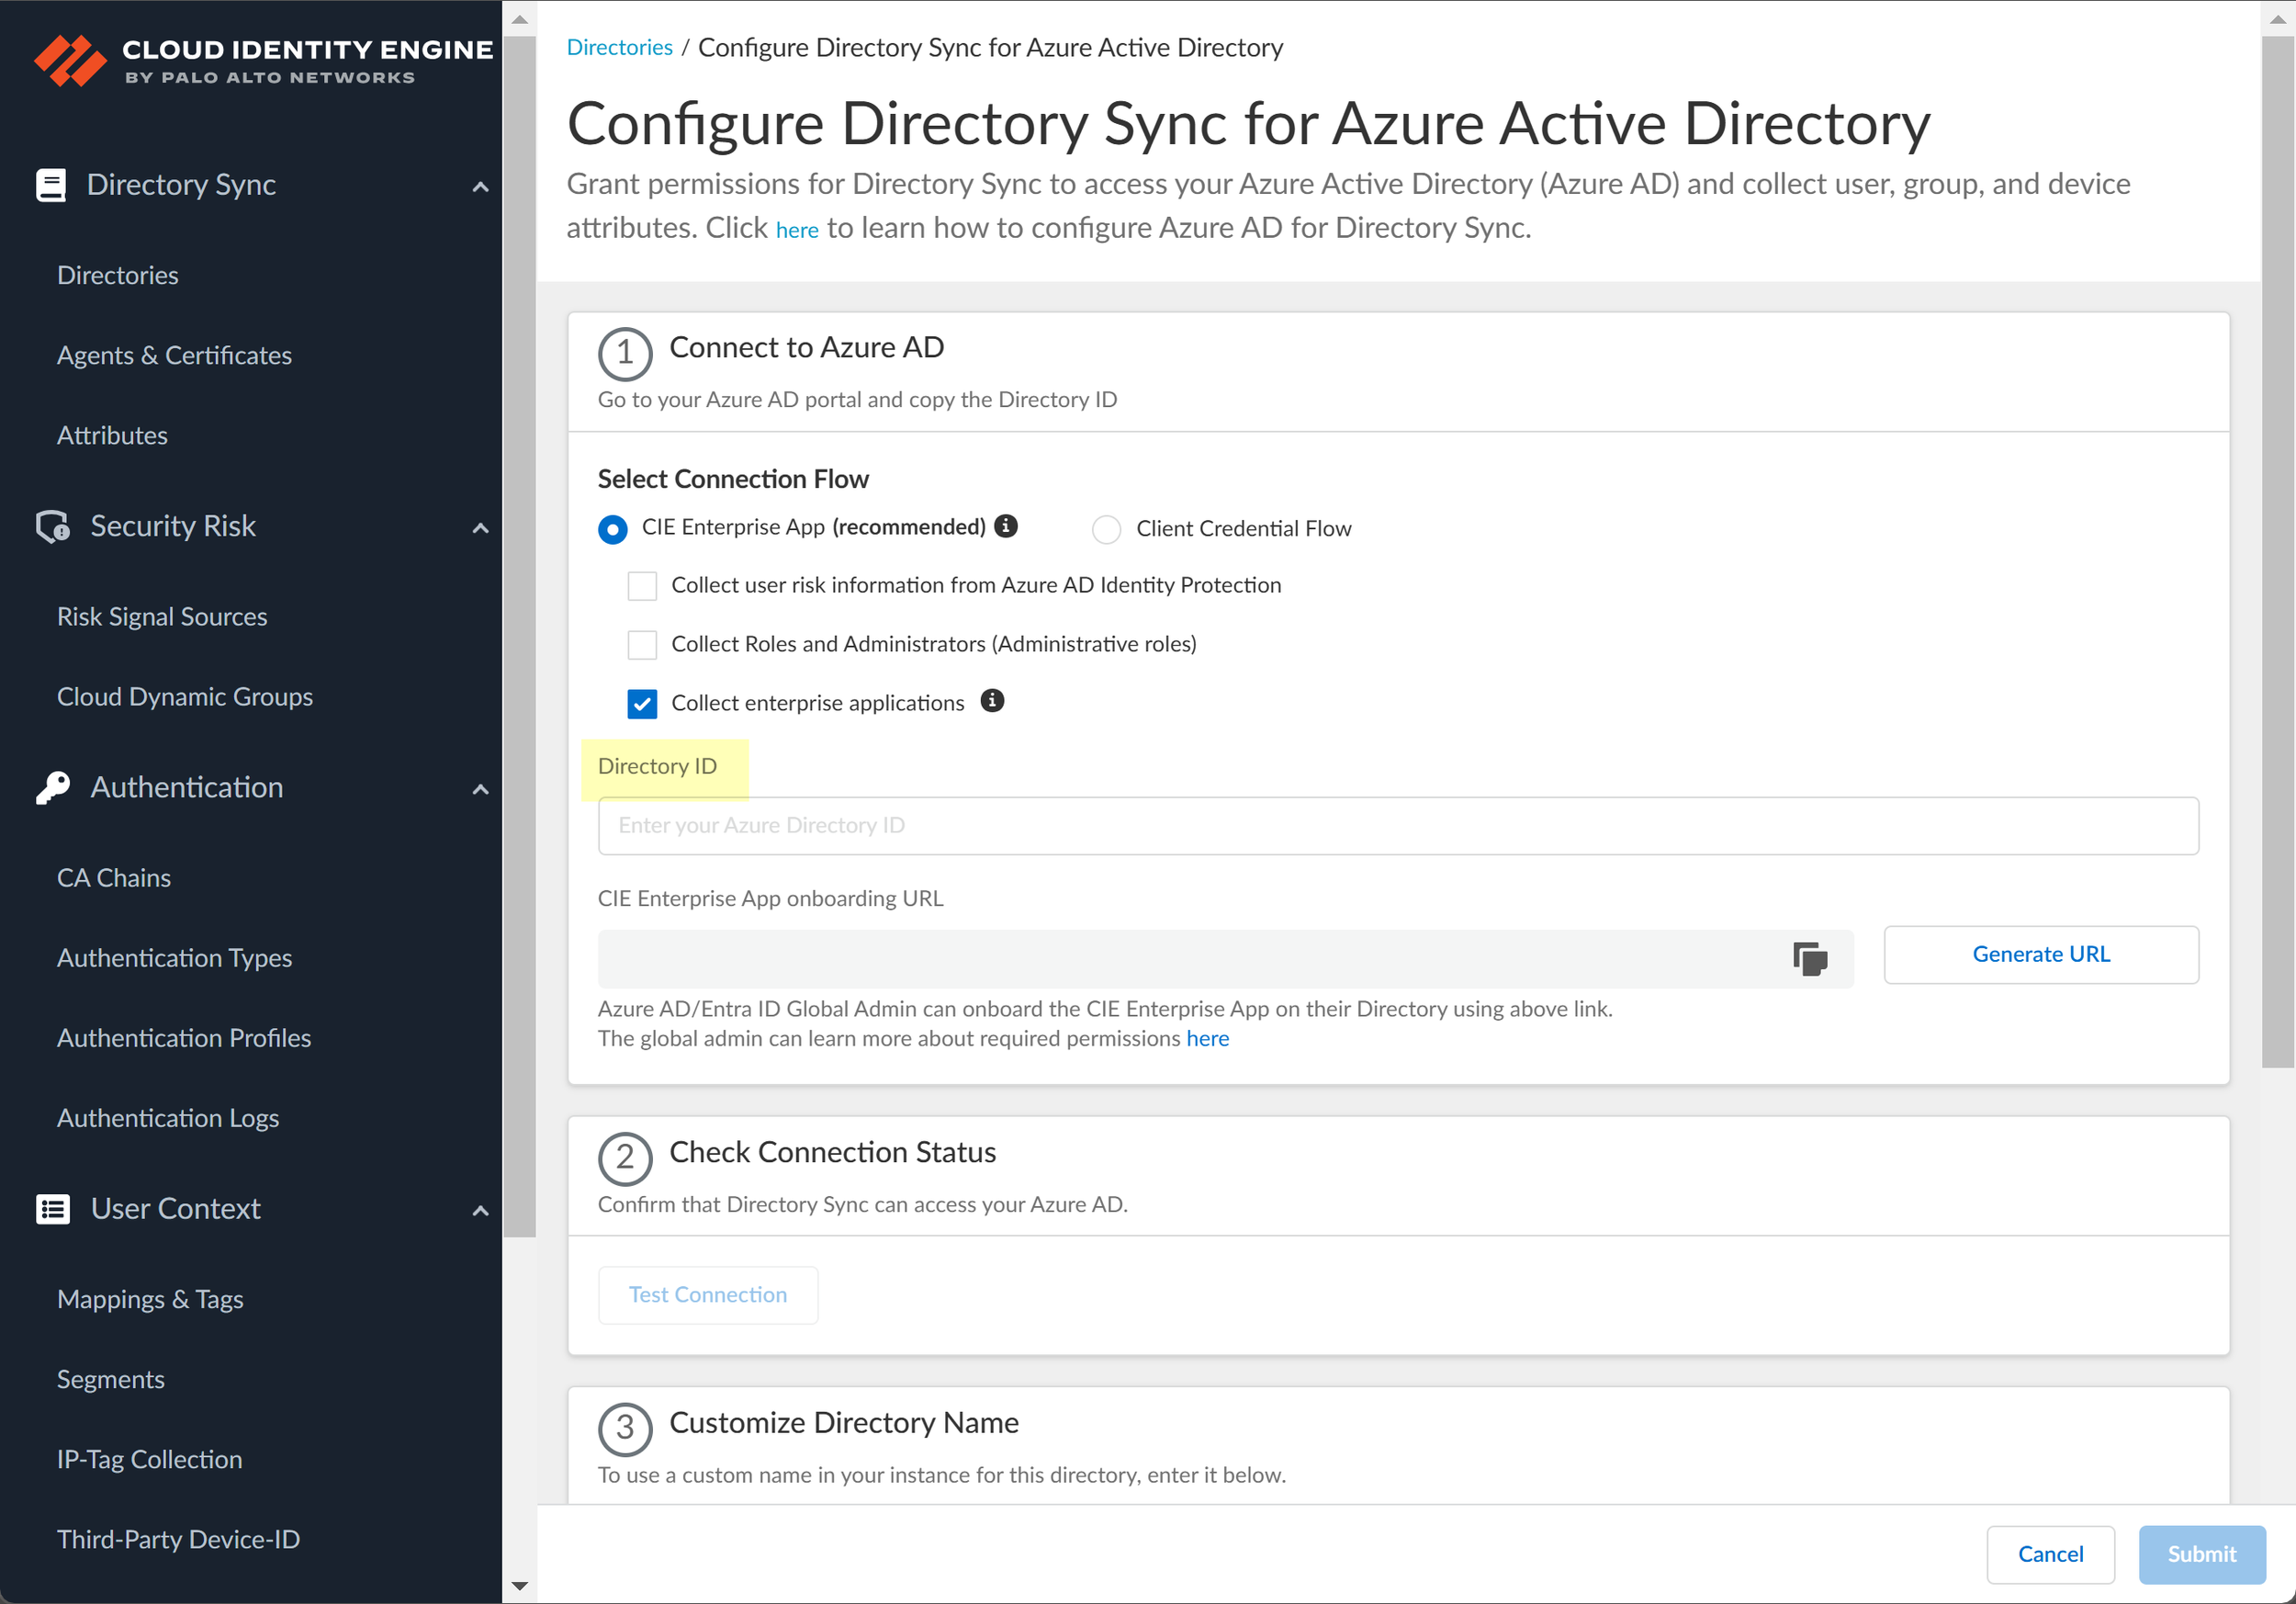
- In CIE, select Directories > Add New Directory and set up an Entra ID Cloud Directory using the CIE Enterprise App path.
- Enter the tenant ID. Leave optional risk, role, application, and device collections at the settings approved for this pilot; group access does not require enabling every optional collection.
Authorize the CIE Enterprise App
- Select Generate URL. Open that onboarding URL as the Global Administrator, confirm the tenant and requested permissions, and accept the required consent.
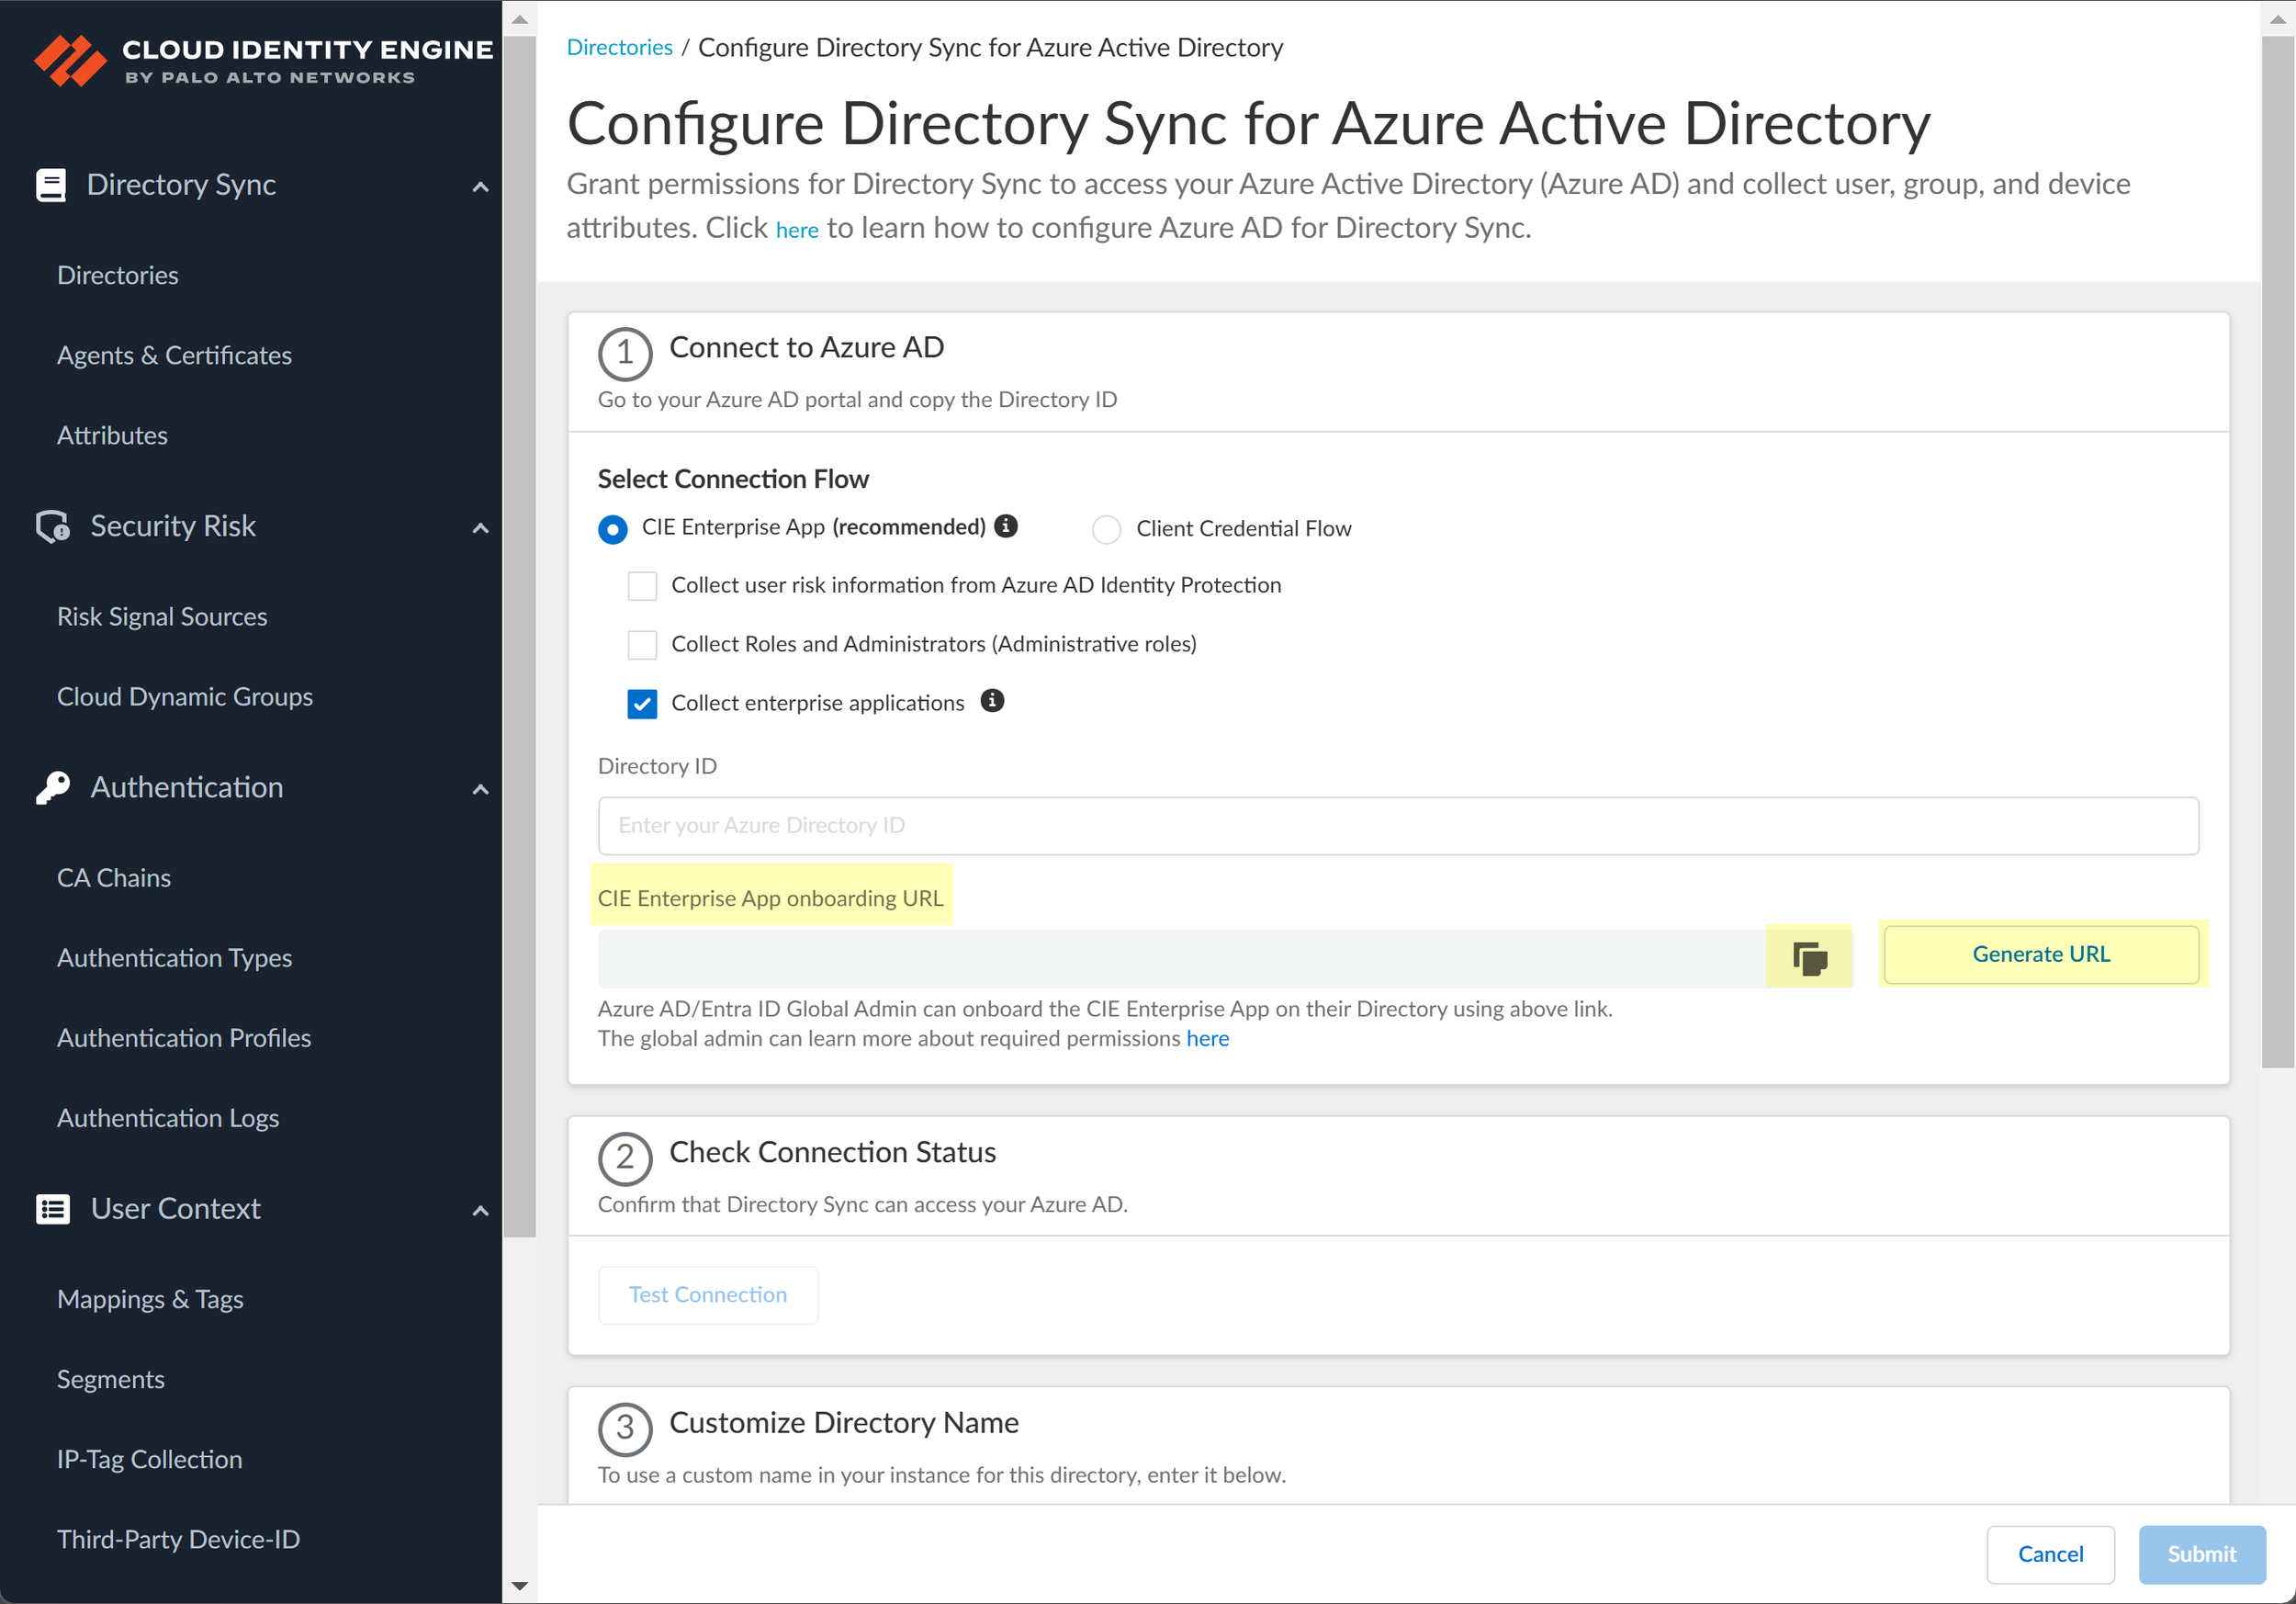
Before continuing, verify that the administrator completed consent for the intended tenant. Generating the link alone does not authorize the connection.
Test the directory connection
- Return to CIE and select Test Connection. Continue only when it succeeds.
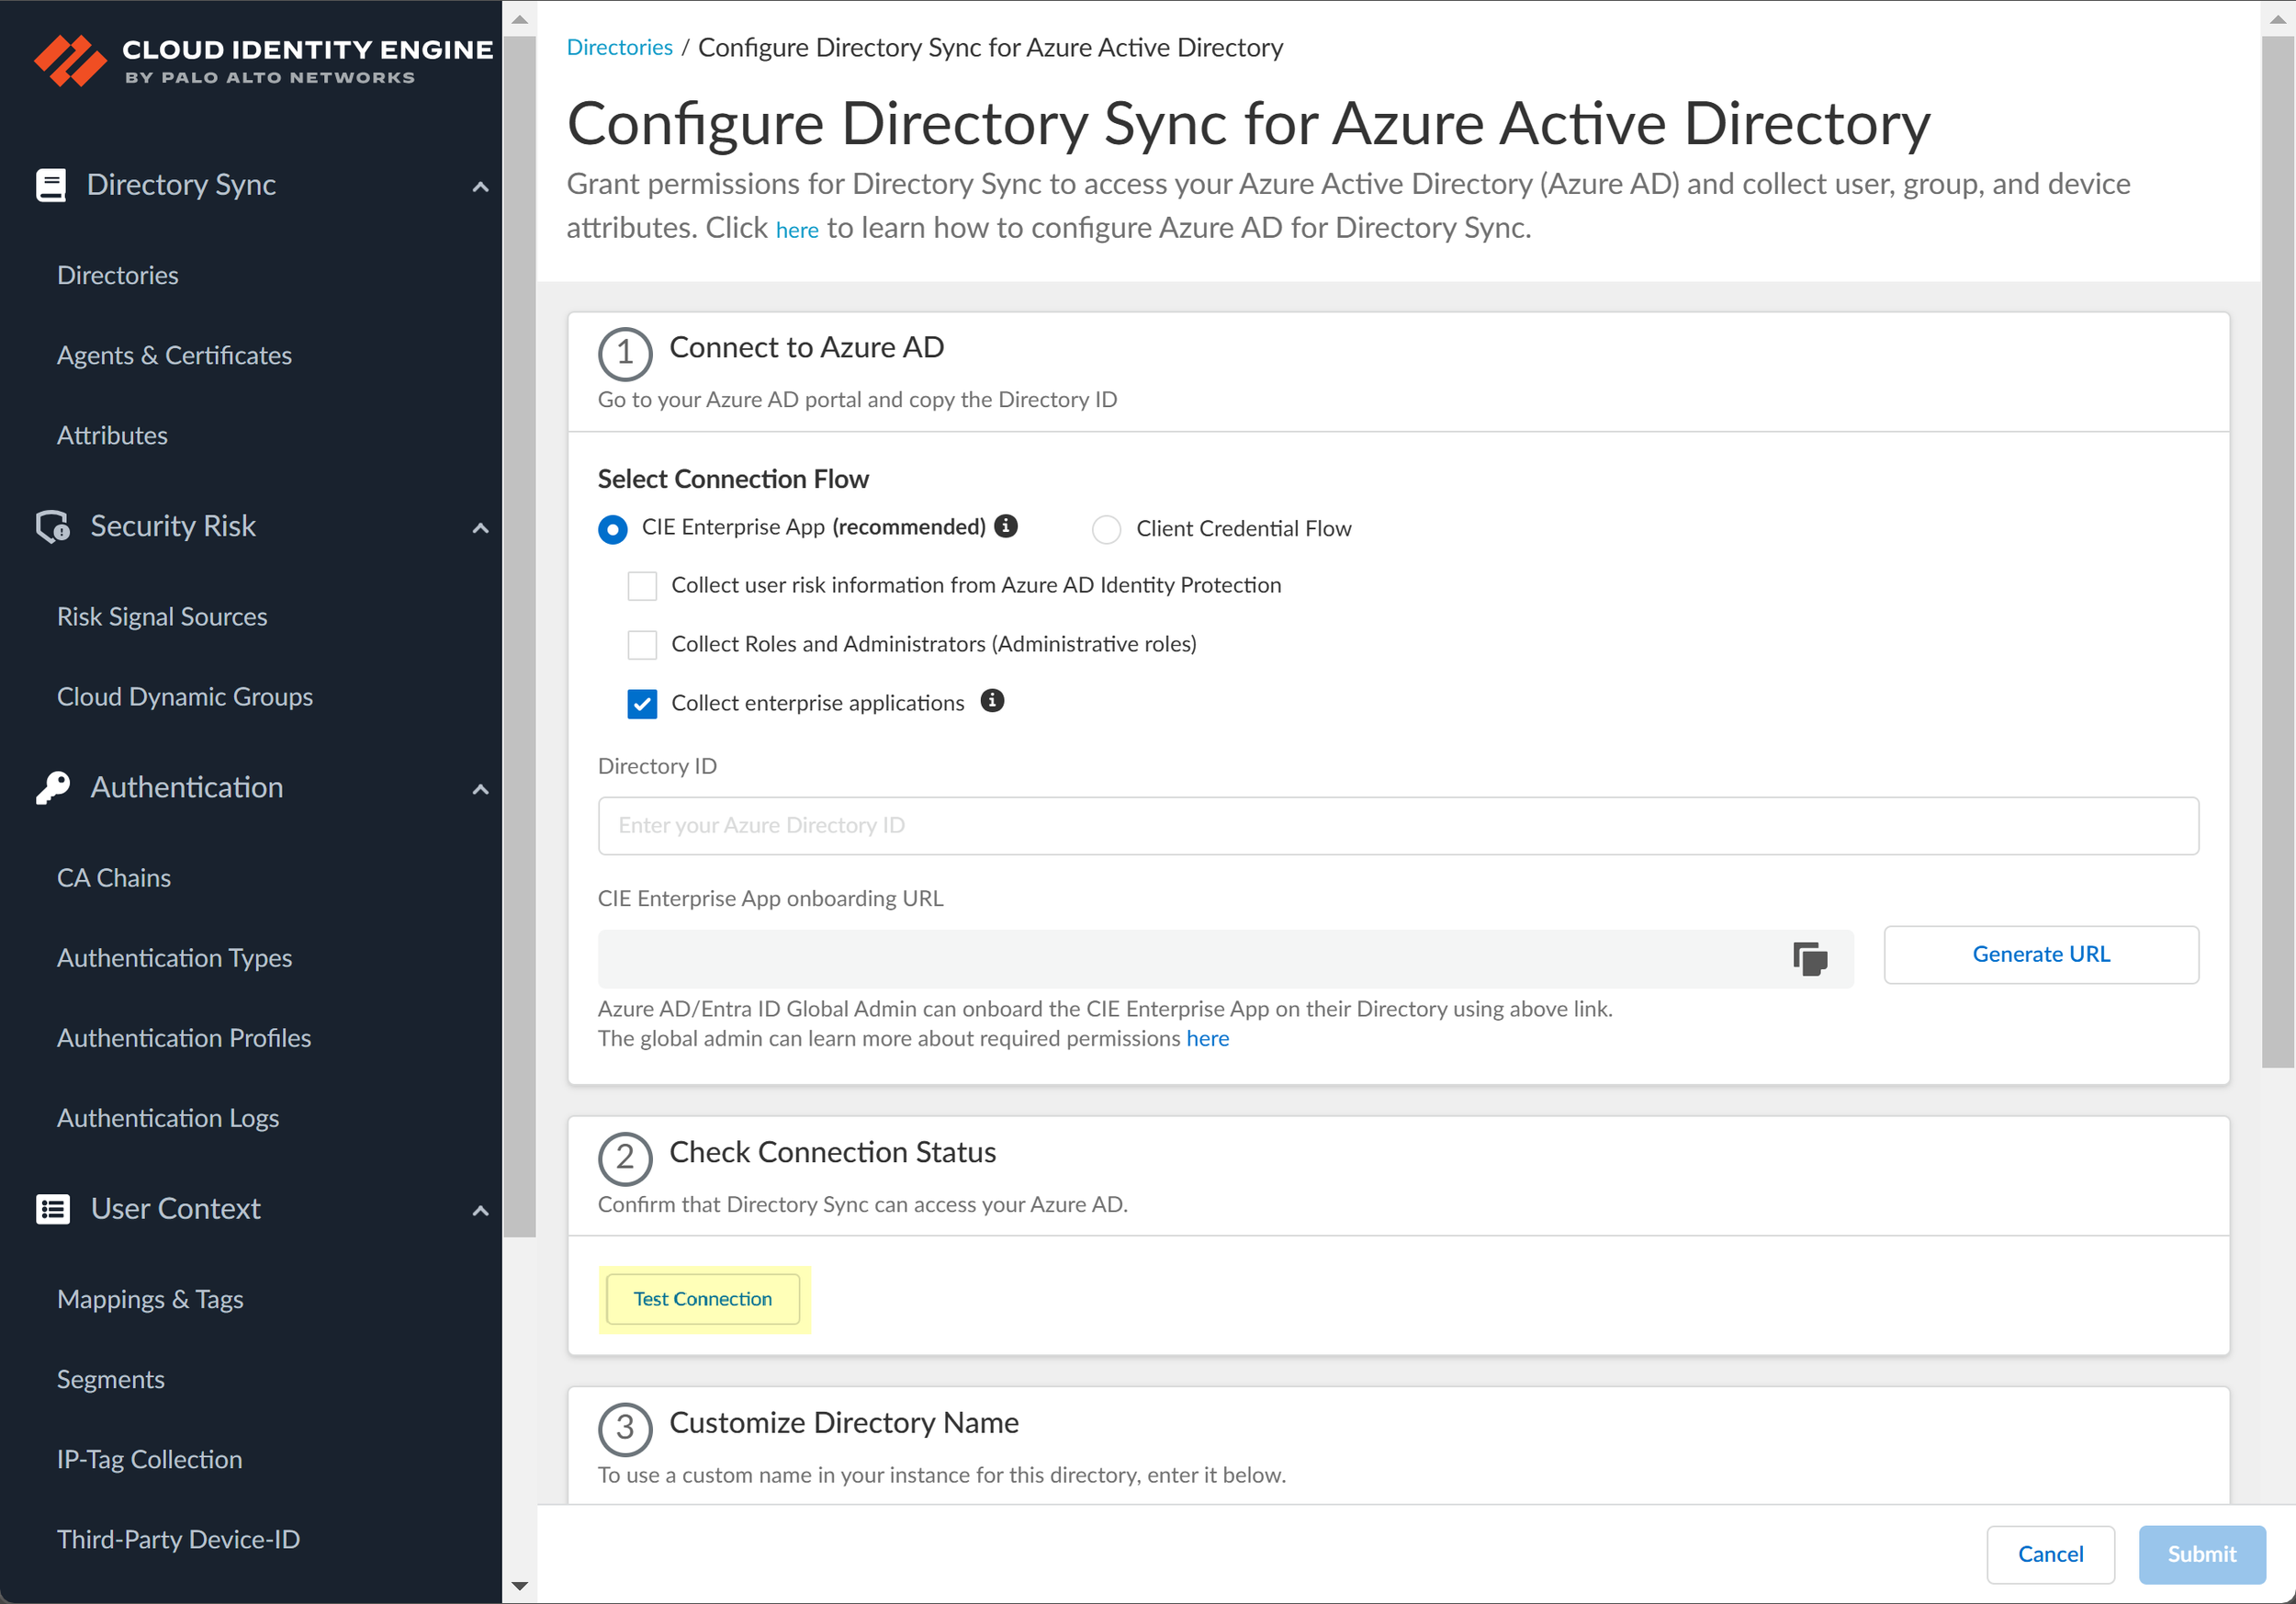
Continue only after your own connection test succeeds. The group and membership check below confirms that CIE received the data needed for the pilot.
Filter and verify the pilot group
- For a new pilot connection, use the group filter Name > is equal to > Finance-Reporting-Pilot. On an existing shared connection, preserve other required filters and add this group only if needed.
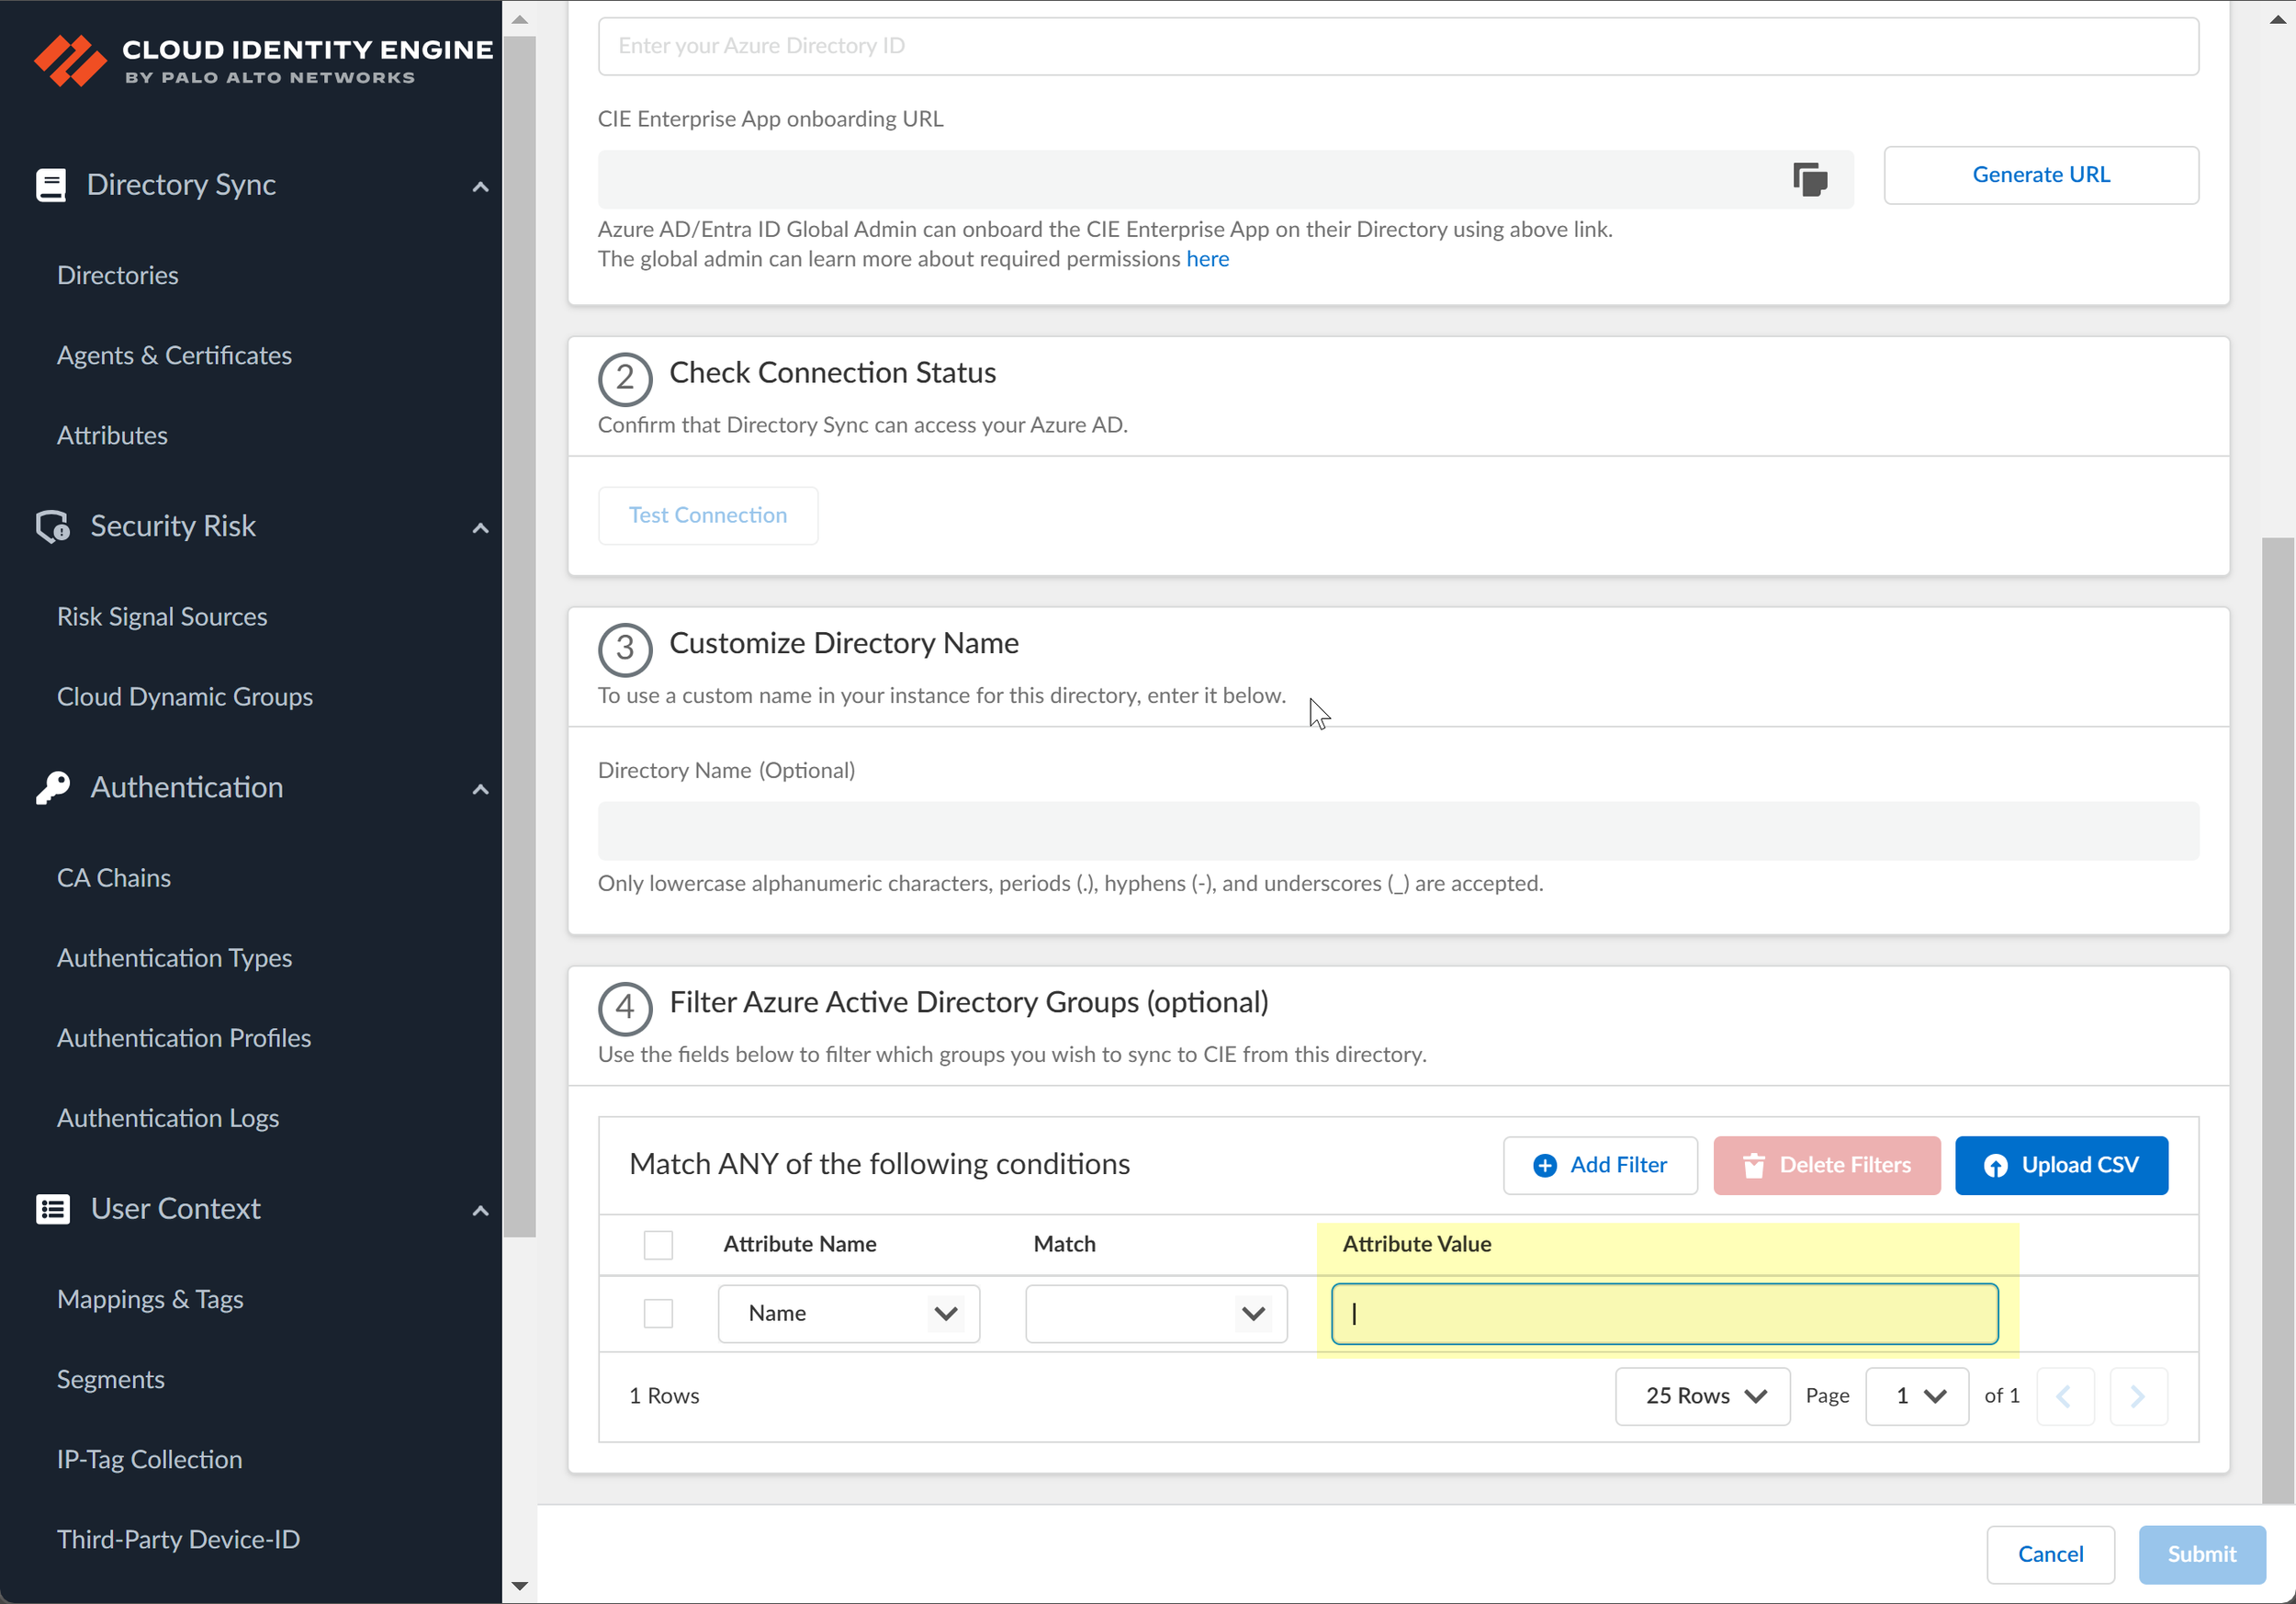
- Select Submit and wait for the initial synchronization to finish.
Check the data before continuing
In CIE Directories, find the directory and check the latest sync status and time. Click its Groups count to open Directory Data. Search for Finance-Reporting-Pilot, open Details, and inspect Member. Alex must appear; Morgan must not.
Open Alex's user details and View Raw Data. Record the attribute containing the UPN and any populated alternate account name. Also record the group-name attribute and its value from the group's raw data. These are the values you will match in the firewall profile.
If the group is missing, recheck its exact name and the directory filter. If membership is wrong, correct it in Entra ID, then use Actions > Sync Changes in CIE once and wait for completion. A successful connection test alone does not prove that the right group was synchronized.
Continue with Step 2. The next page is the alternative path for an on-premises directory.
Step 1B Connect on premises Active Directory
Use a dedicated Windows Server 2022 host with at least 8 GB RAM and 10 GB free disk, correct DNS and time, and an account permitted to install software. Obtain a directory service account that can bind and read the required domain. The domain controller must already support LDAPS, which encrypts directory queries.
The Cloud Identity agent reads directory attributes for CIE. A Windows User-ID agent collects user-to-IP information. Install these different agents on separate hosts.
Prepare the group and network path
In Active Directory Users and Computers, right-click the approved organizational unit and choose New > Group. Create Finance-Reporting-Pilot as a Global Security group for this single-domain example. Open its Members tab, add Alex, and leave Morgan outside it.
Have the network administrator permit the following outbound connections from the agent host. Use the endpoint for the actual CIE region; the examples below show Canada and the United States.
| Destination | Port | Purpose |
|---|---|---|
| Your domain controller name | TCP 636 | Encrypted directory queries |
| agent-directory-sync.ca.apps.paloaltonetworks.com or agent-directory-sync.us.paloaltonetworks.com | TCP 443 | Agent connection to the selected CIE region |
| crl.godaddy.com and ocsp.godaddy.com | TCP 80 | Certificate validity checks |
| certs.godaddy.com | TCP 443 | Certificate services |
Permit DNS and time synchronization to your existing infrastructure. Exclude the agent-to-CIE connection from TLS decryption so its mutual certificate authentication can work. On a Palo Alto firewall, account for paloalto-cloud-identity and its ssl and web-browsing dependencies in the connectivity rule.
Install the agent and its certificates
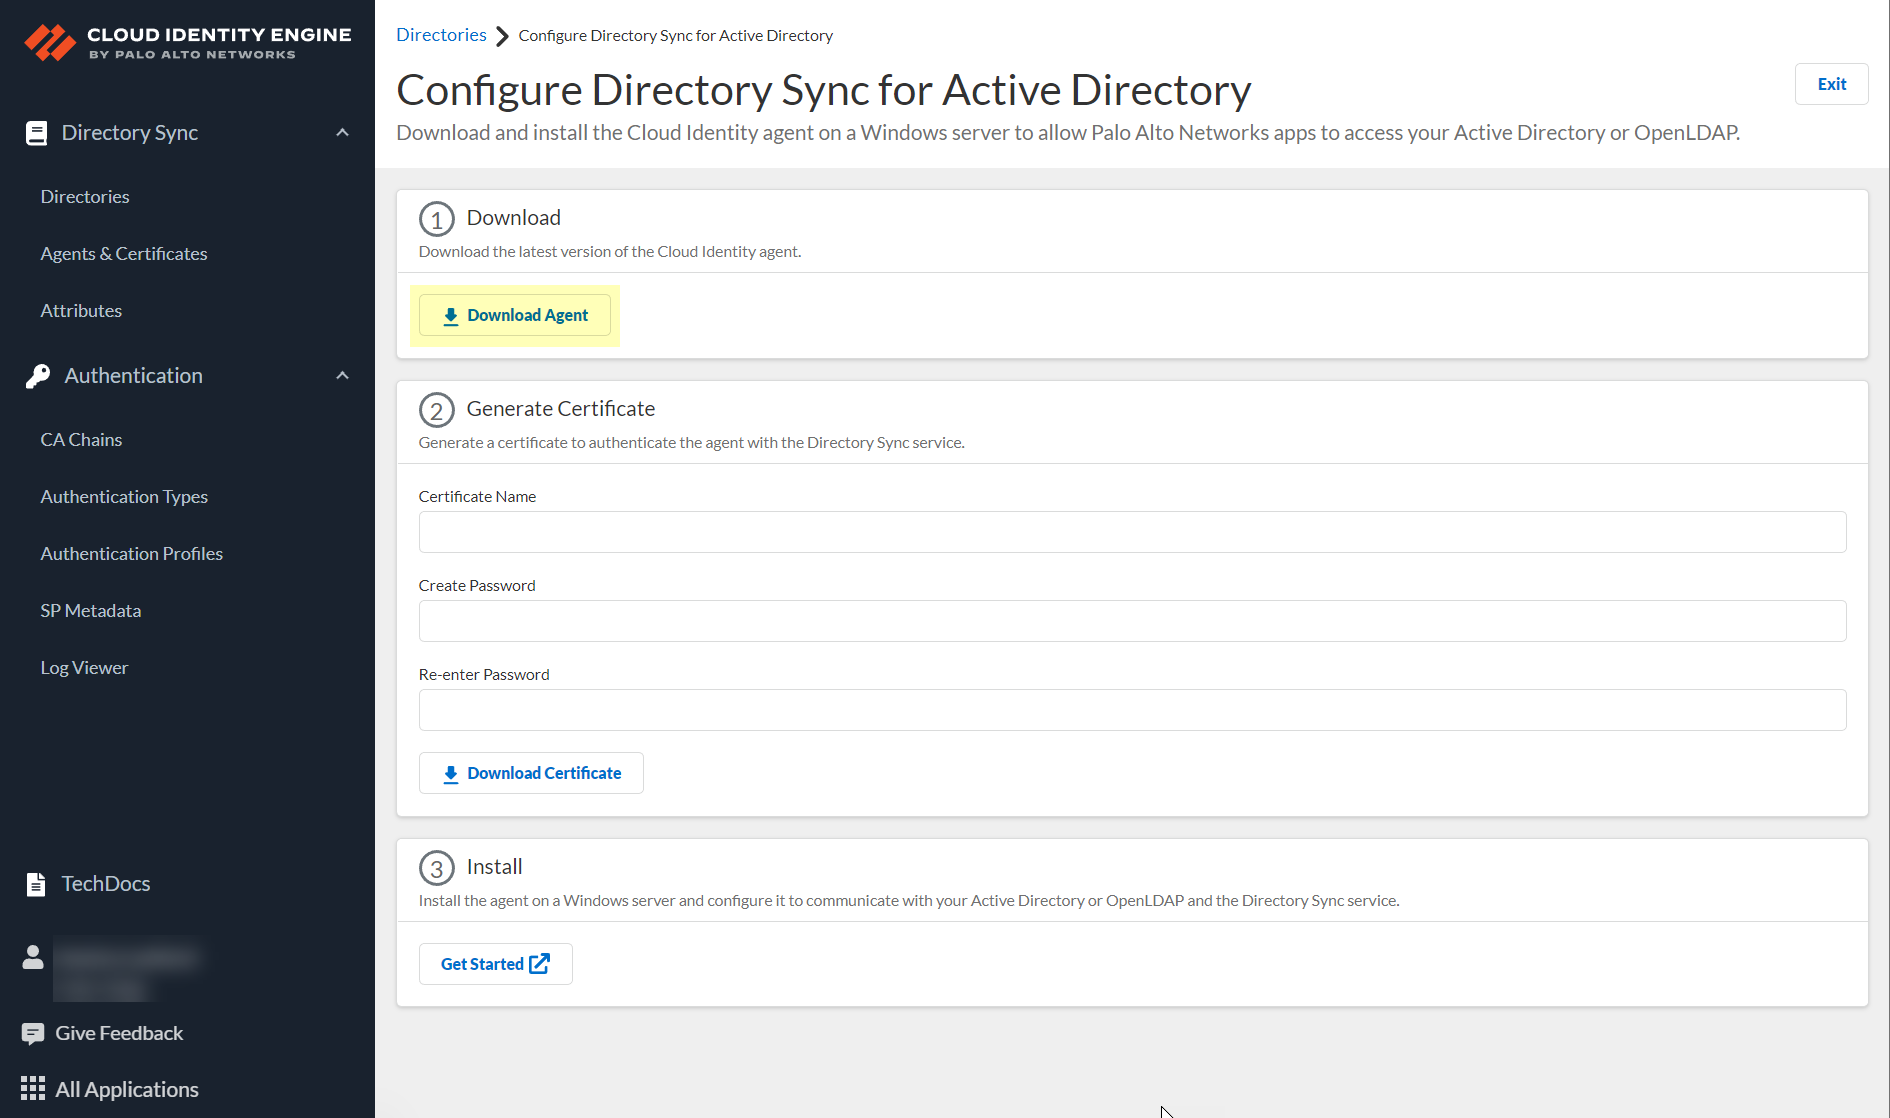
- In CIE, open Directories > Add New Directory > Set Up an On-Premises Directory > Download Agent. Run
DaInstall.msion the dedicated host and complete the installer.
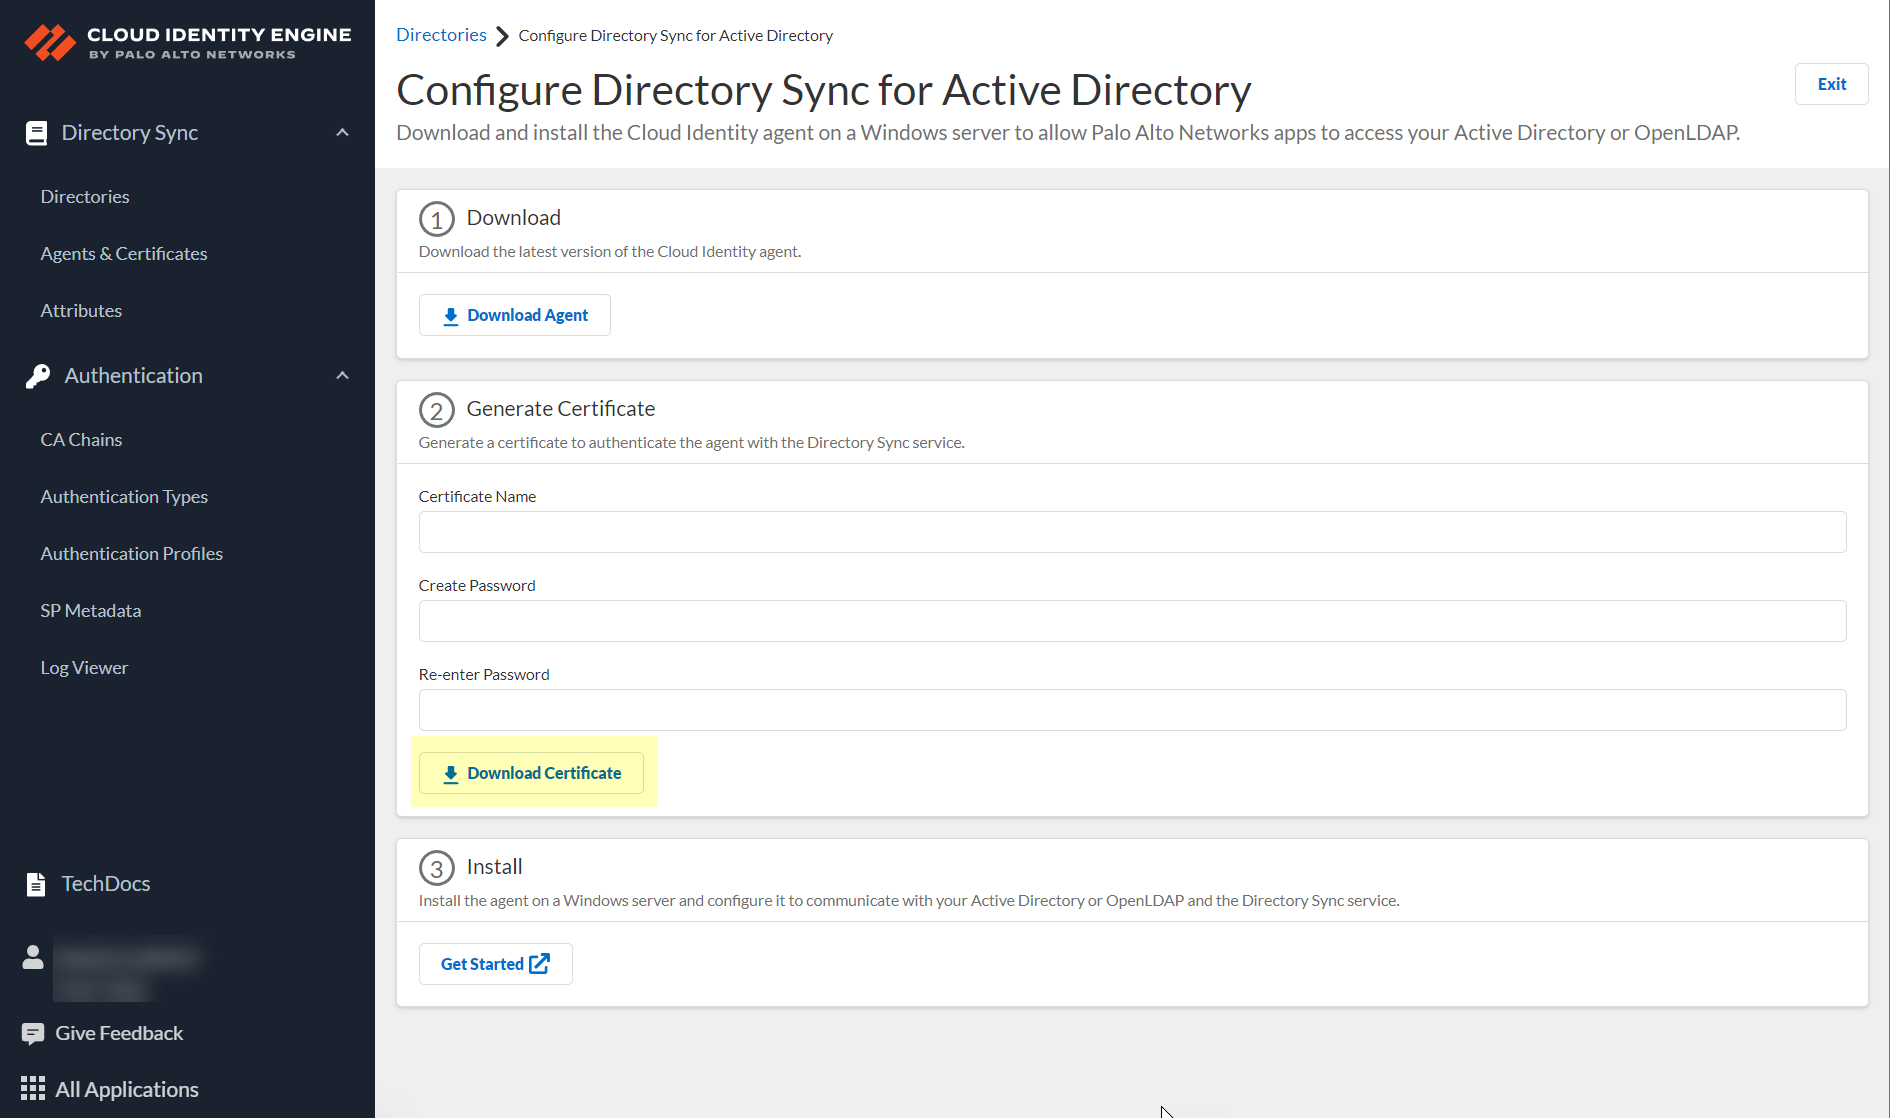
- In CIE Agents & Certificates, choose Get New Certificate. Use a unique name such as
CIEAgentPilot01and a secure password of 12–25 characters. Download the certificate for this agent only.
Import the agent and directory certificates
- On the host, open
certlm.msc. Under Personal > Certificates, use All Tasks > Import to import the downloaded certificate and private key with its password. Use the Local Computer store, not Current User. - Import the CA certificate that issued the domain controller's LDAPS certificate into Local Computer > Trusted Root Certification Authorities; put any intermediate CA certificates in the corresponding Intermediate store. This CA trust is separate from the agent's personal certificate.
Configure the on premises agent
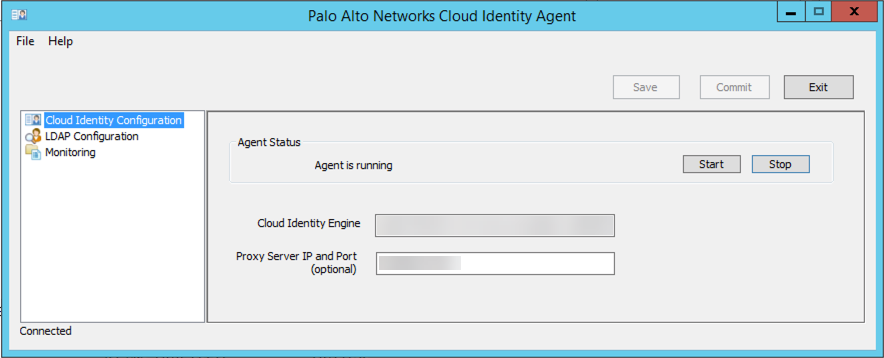
- Open Start > Palo Alto Networks > Cloud Identity Agent. Under Cloud Identity Configuration, enter the regional endpoint from the network table in this section. If your organization uses a proxy, enter its approved address and port; use agent version 1.7.1 or later for proxy support.
Configure LDAP access
- Under LDAP Configuration, enter the service account's Bind DN and password. To find that account's distinguished name, run
dsquery user -name <account-name>on a Windows host with the AD tools; remove surrounding quotation marks when copying the result. - Select LDAPS. Retain the initial Bind Timeout of 30 seconds and Search Timeout of 15 seconds.
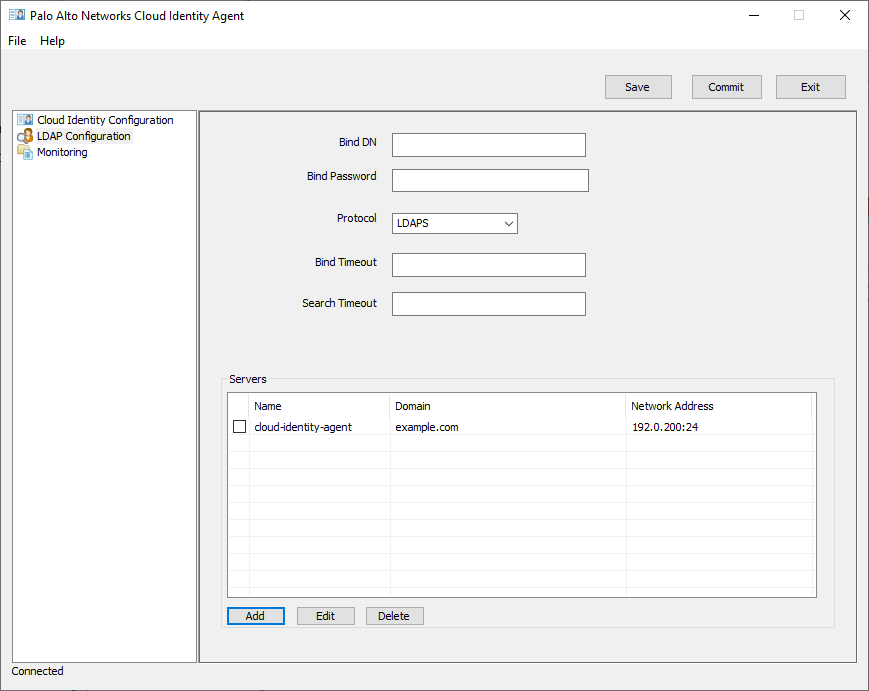
Add and test the domain controller
- Add the directory. Enter the full AD domain, such as
example.com, the domain controller's full hostname, such asdc01.example.com, port 636, and type Active Directory. Use the controller name covered by its certificate. Do not use Global Catalog port 3269.
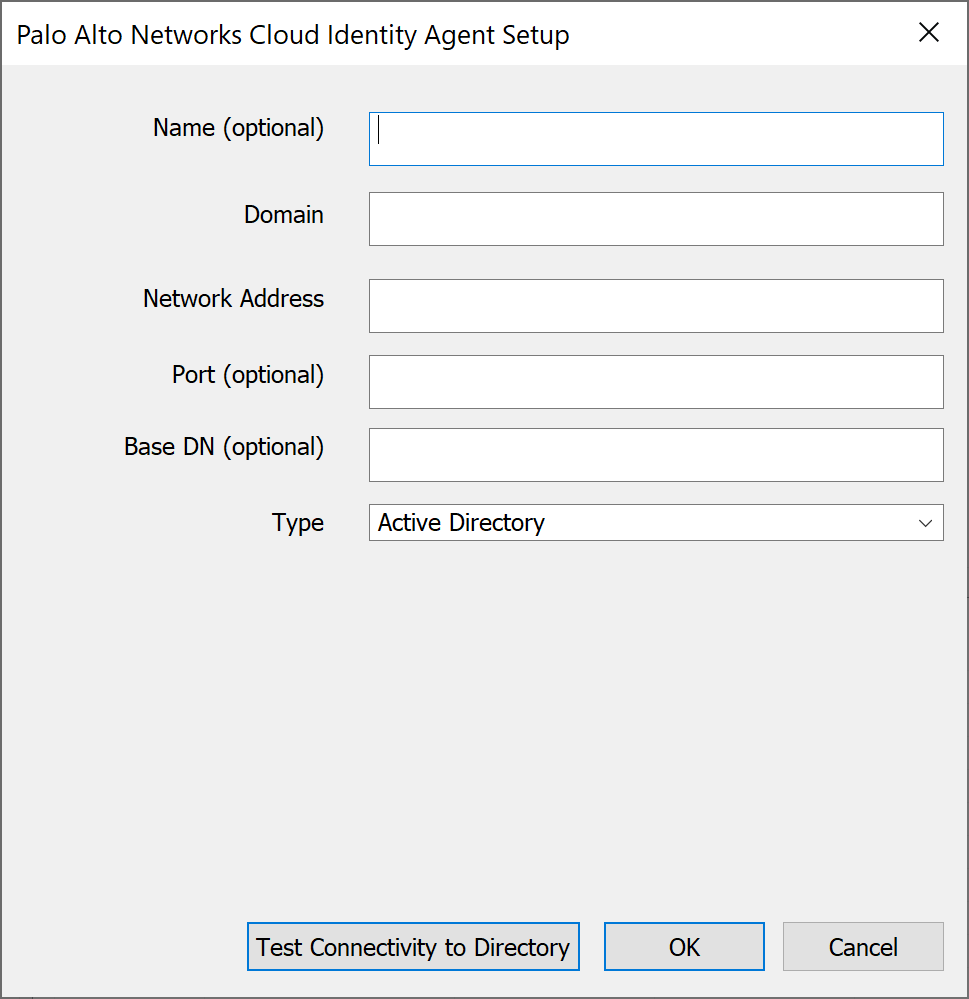
- Select Test Connectivity to Directory. After a successful test, choose OK, then Commit in the agent.
Verify the directory arrived in CIE
Open CIE Directories and wait for a successful synchronization. Check that the domain, NetBIOS name, and object counts are populated. The NetBIOS name is the short domain prefix in an account such as EXAMPLE\alex.
Click the directory's Groups count. Search for Finance-Reporting-Pilot, open Details, and confirm Alex is listed under Member. Use View Raw Data to record the group's name attribute. Open Alex's user details and record the UPN and short account-name attributes. Keep those names for Step 2.
If the directory test fails, run the following on the agent host, replacing the hostname:
Test-NetConnection dc01.example.com -Port 636A successful TCP test proves that the port is reachable. It does not validate the certificate or service-account password. If the port is reachable but the agent test fails, check the LDAPS certificate trust, hostname, bind account, and password.
If the directory test succeeds but CIE remains empty, check the regional endpoint, the agent's personal certificate, and its connection status under Agents & Certificates. Confirm that the upstream firewall is not decrypting the agent-to-CIE connection.
Checkpoint: CIE contains the intended group and the correct member. Correct missing or incorrect directory data here before building an access rule.
Step 2 Connect CIE to the enforcing firewall
Check the firewall device certificate
On the firewall, open Device > Setup > Management and inspect Device Certificate. If it is valid, retain it. Otherwise, confirm DNS, NTP, and outbound connectivity before obtaining one.
For an OTP-based device, in the Customer Support Portal choose Products > Device Certificates > Generate OTP, select the NGFW device type and this firewall's serial number, then copy the one-time password. On the firewall, select Get certificate, paste the OTP, and confirm. Refresh the page and verify validity. An unused OTP lasts 60 minutes; obtain another after a failed retrieval.
For certificate retrieval, allow TCP 443 to api.paloaltonetworks.com, apitrusted.paloaltonetworks.com, certificatetrusted.paloaltonetworks.com, and certificate.paloaltonetworks.com; allow TCP 80 to ocsp.paloaltonetworks.com, crl.paloaltonetworks.com, and ocsp.godaddy.com. Some hardware retrieves its certificate automatically during registration.
Add the directory profile
On a standalone firewall, open Device > User Identification > Cloud Identity Engine > Add. In Panorama, select the target Template first and use that same Device menu for the managed firewall.
| Field | What to enter |
|---|---|
| Name | CIE-Pilot |
| Region and Instance | The region and CIE instance recorded during activation |
| Domain | The directory domain that contains the pilot group |
| Enabled | Selected |
| Update Interval | 5 minutes for this small pilot; this is the firewall refresh interval |
| Primary Username | The UPN attribute observed in Alex's directory data, commonly userPrincipalName |
| Alternate Username | Add the populated short account-name attribute if the existing login produces EXAMPLE\alex; do not add an empty attribute |
| Group Name | Select the attribute recorded from the pilot group's raw data; use its actual directory attribute name |
Click OK and commit the profile. With Panorama, Commit to Panorama, then Push to Devices for the intended template stack and firewall. Check that both jobs succeed. Do not create only a Panorama administrator-identification profile and assume it configures the managed firewall.
Run show user cloud-identity-engine statistics all on the enforcing firewall. Check the intended profile and successful updates. The firewall retrieves attributes for users and groups referenced by policy; complete Step 4 before treating an empty local group-membership list as a connection failure.
Step 3 Verify the current user and IP address
- On Alex's test computer, open GlobalProtect, connect to the existing portal, and complete user authentication. Repeat on Morgan's separate test computer.
- On the firewall, open Network > GlobalProtect > Gateways and select Remote Users in the gateway's Info column. Record each account and assigned tunnel IP. A machine or pre-logon account is not Alex's completed user login.
- Find the gateway's tunnel interface under Agent > Tunnel Settings, then find that interface under Network > Interfaces > Tunnel and note its security zone.
- Open Network > Zones, edit that source zone, select Enable User Identification, and click OK. In Panorama, make the change in the template that owns the zone. Commit and push the selected scope as in Step 2.
- On the enforcing firewall's CLI, run the following with each actual tunnel IP:
show user ip-user-mapping ip 192.0.2.25
show user ip-user-mapping ip 192.0.2.26
The first address must resolve to Alex and the second to Morgan, with the expected GlobalProtect mapping source. If no mapping appears, check the gateway user session and actual tunnel IP before editing group membership. Enable identification on the trusted tunnel source zone, not indiscriminately on the internet-facing zone.
Create the pilot address objects
In Objects > Addresses > Add, create UID-Pilot-Alex with type IP Netmask and Alex's current tunnel address as /32. Create UID-Pilot-Morgan the same way. Create UID-Reporting-Server with the reporting server's actual address as /32.
In Objects > Address Groups > Add, create the Static group UID-Pilot-Clients and add the two client objects. In Panorama, create these objects in the device group that will hold the pilot rules.
Open Monitor > Logs > Traffic and inspect a known connection to the reporting server. Confirm its source zone, destination zone, and Application. The next page assumes a dedicated HTTPS server identified as ssl on TCP 443. If your application is identified differently, use its observed App-ID and required dependencies instead of copying ssl blindly.
Checkpoint: both test accounts have correct IP mappings, the test addresses are accurate, and the application's traffic crosses this firewall. If NAT or a proxy hides multiple people behind one address, this simple per-IP pilot needs a different identification design.
Step 4 Create the application access boundary
Open Policies > Security > Add. In Panorama, select the target Device Group and its appropriate rulebase. Create the following allow rule; replace the zones and select the actual discovered group from CIE.
| Tab and field | Pilot value |
|---|---|
| General > Name | UID-Pilot-Allow-Reporting |
| General > Rule Type | universal |
| Source > Source Zone | GP-USERS |
| Source > Source Address | UID-Pilot-Clients |
| Source > Source User | The discovered Finance-Reporting-Pilot group |
| Destination > Destination Zone | REPORTING |
| Destination > Destination Address | UID-Reporting-Server |
| Application | ssl for the dedicated HTTPS example |
| Service/URL Category > Service | application-default |
| Actions | Allow; Log at Session End; existing approved security profiles and log-forwarding profile |
Use the group identifier returned by the selector, not an assumed display name. If Panorama cannot browse it, first verify the profile and directory data on the firewall; a master device can supply group information to the device group. Under Panorama > Device Groups, edit the group and select the intended firewall as Master Device if that is your approved group-browsing design.
Create a second rule named UID-Pilot-Deny-Reporting with the same source zone, source address group, destination zone, and destination server. Set Source User, Application, and Service to any; set Action to Deny and enable session-end logging. Save it below the pilot allow rule.
Move both rules above broader permits that could match these test clients and this server. Keep mandatory security blocks above them. Inspect inherited Panorama rules as well as local rules; the first matching rule wins. A later broad permit must not become an alternative route around the group requirement.
On a standalone firewall, review the candidate changes and Commit. With Panorama, Commit to Panorama, then Push to Devices for the target device group and firewall; include the template stack only if its required changes are still pending. Check each job result.
The ssl example limits access to an encrypted service on a dedicated server. It does not distinguish multiple business applications sharing that server. A production policy needs the application's actual traffic requirements, inspection, and dependencies.
Step 5 Prove that the rule works
Wait for the directory synchronization and firewall refresh to complete. On the enforcing firewall, run:
show user cloud-identity-engine statistics all
show user group list
show user group name <exact-group-name>
show user ip-user-mapping ip <alex-tunnel-ip>
Replace the placeholders; use the group name returned by the firewall. Confirm that Alex belongs to the relevant group and that the current IP maps to that account. If a group name contains spaces, quote it in the CLI.
From Alex's computer, open the application's actual HTTPS address. Close the test connection after checking access. In Monitor > Logs > Traffic, filter on the test source IP and reporting-server destination. Open the matching log and inspect Source User, Application, Rule, and Action. Expect Alex, the observed application, UID-Pilot-Allow-Reporting, and an allow action.
Repeat from Morgan's computer. Expect Morgan's correct identity and UID-Pilot-Deny-Reporting. A browser error alone is not proof of a firewall deny; record the matching log.
| Test | How to perform it | Passing result |
|---|---|---|
| Member | Alex opens the application | Pilot allow rule matches |
| Nonmember | Morgan opens the same address | Pilot deny rule matches |
| Reconnection | Reconnect Alex; update the client /32 object if needed and commit; open a new session | New IP still resolves to Alex and the allow rule |
| Membership removal | Remove Alex from the group; sync CIE, wait for firewall refresh, confirm membership is gone, and start a new session | Pilot deny rule matches |
| Unknown user | In an isolated lab, use a prepared client whose IP has no mapping and is included in the pilot source group | Pilot deny rule matches |
| Different resource | Try a separately approved test destination | The pilot allow rule does not match; inspect the separate policy governing that destination |
Do not clear production identity caches to manufacture the unknown-user test. A directory edit does not guarantee immediate revocation: synchronization, cached data, and existing sessions affect timing. Restore Alex's approved membership and verify it after the removal test.
The two pilot rules restrict access to the reporting server. They do not remove other access granted elsewhere in the rulebase. Record those other paths as separate segmentation work.
If the pilot disrupts required access, disable both newly added pilot rules, commit or push that change, and verify the prior access behavior. Use the saved snapshot for controlled recovery if needed; do not overwrite unrelated concurrent changes.
When another firewall needs the mapping
The first pilot uses the GlobalProtect gateway as the enforcing firewall. When traffic is enforced elsewhere, that second firewall needs both the current mapping and directory group data.
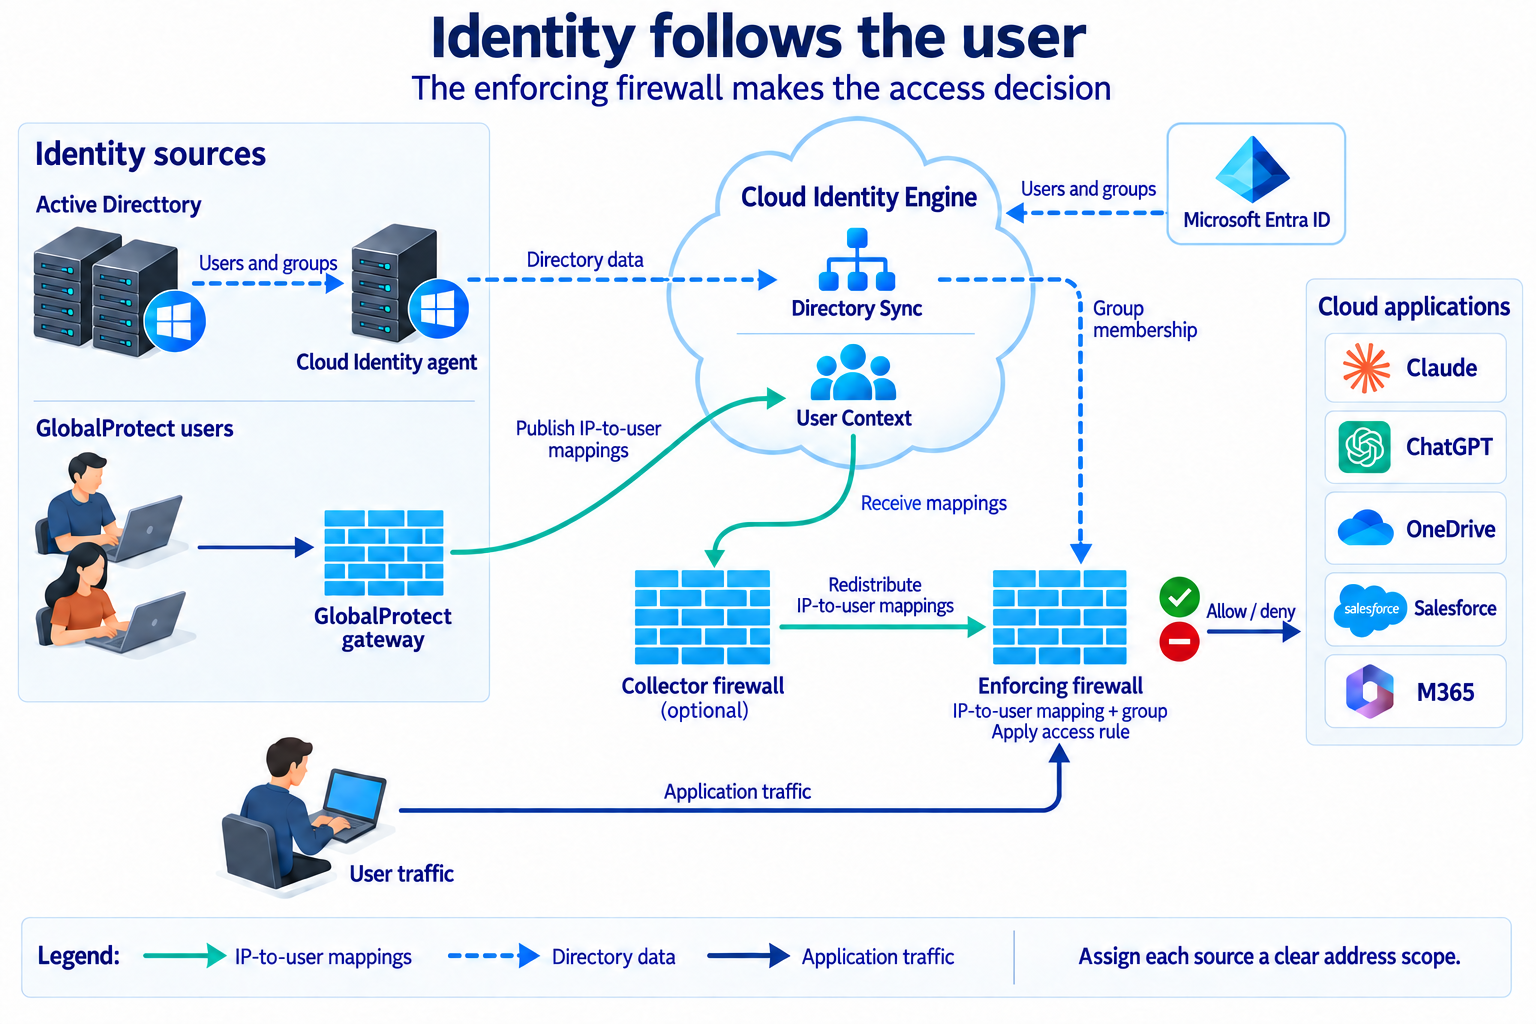
Here, the GlobalProtect gateway publishes IP-to-user mappings to CIE User Context. The optional collector receives and redistributes them. The Cloud Identity agent connects on-premises AD to CIE Directory Sync for users and groups, as in Step 1B. It is a different agent from the Windows User-ID agent that learns mappings from AD logon events. Microsoft Entra ID supplies cloud directory data through the Step 1A connection.
CIE Directory Sync supplies group membership through the enforcing firewall's CIE profile. The mapping path requires separate User Context publishing and subscribing; Directory Sync alone does not enable it. An enforcing firewall can subscribe directly when a collector is unnecessary. The application examples assume their traffic passes through the enforcing firewall.
Configure the firewall redistribution link
For a simple single-virtual-system lab connection between two firewalls, use the gateway as the sending agent and the second firewall as the receiving client:
- On the sender, create an Interface Management profile under Network > Network Profiles. Enable User-ID, limit permitted IPs to the receiving firewall's source address, and assign it to the internal interface the receiver can reach.
- Permit TCP 5007 from the receiver to that sender interface. On the receiver, open Device > Data Redistribution > Agents > Add. Enter a name, the sender's host address, port 5007, select Enabled, and select IP User Mappings.
- If the receiver needs a particular outgoing interface, open Device > Setup > Services > Service Route Configuration > Customize > UID Agent and select its source interface and address.
- In Device > Data Redistribution > Include/Exclude Networks, explicitly include the pilot address scope. Commit the approved changes on both devices.
- On the receiver, inspect the agent's Status and confirm connection. Query Alex's mapping there and compare it with the sender. Configure CIE group data and enable User-ID on the receiver's actual traffic source zone before applying its group rule.
This small lab path uses the platform's existing trust configuration. Production redistribution should follow the organization's certificate and source-coverage design. Avoid creating a second collection path for the same addresses without deciding which source is accurate and current.
Redistribution does not send directory group membership in place of group mapping. A collector connection can be healthy while the receiving firewall still lacks the group needed by the rule.
Follow the evidence when access is inconsistent
| What you see | What to do next |
|---|---|
| Source User is empty | Check the gateway user session, current tunnel IP, source-zone identification, and the mapping command on the enforcing firewall. If using redistribution, check each hop. |
| User appears but the group rule misses | Inspect the group's current membership and username attributes. Then check the actual matched rule and any earlier broad permit. |
| Username alternates between a short name and a UPN | Open Monitor > Logs > User-ID. Filter the test IP and compare time, source name, and username across updates. Compare the same IP on the collecting and enforcing firewalls. |
| Nonmember still reaches the server | Read the traffic log's Rule and Action. Recheck rule order, source objects, destination, and whether the test reused an existing session. |
| Several people appear behind one IP | Identify the NAT, proxy, or terminal server involved. Select a method that distinguishes its users before relying on this simple IP mapping. |
Two username formats can describe one person. If EXAMPLE\alex and alex@example.com alternate, first verify whether both resolve to Alex's directory account and group. A changing label alone does not prove that access changed.
If two sources keep replacing the same mapping, document which source owns that address range and why. After verifying coverage, exclude the overlapping range from the less suitable collection path. Do not remove a collector merely because it contributes one of the observed formats.
Why this matters to a Zero Trust project
The application owner can now recognize the intent of the access rule, and IT has a repeatable way to check the account, group, destination, and decision. That can reduce the time spent reconstructing access from addresses and unexplained exceptions.
User-ID supplies one input to Zero Trust. It does not replace authentication, device checks, application inspection, or a verified traffic path. A firewall rule cannot inspect traffic that bypasses the firewall.
What to do now
Choose one application, its owner, two test users, and a small approved group. Run the pilot and retain its allow and deny evidence before expanding.
If the next step involves multiple sites, competing identity sources, inherited broad rules, or unclear application dependencies, Router ID provides segmentation and Zero Trust consultancy to help work through that design.